
CIBA Authentication with Duende Identity Server
For Project Code > GitHub
CIBA (Client Initiated Backchannel Authentication) is an authentication method used within the frameworks of OAuth 2.0 and OpenID Connect (OIDC). This method provides a more secure and convenient way to perform authentication in scenarios requiring user interaction.
CIBA is commonly used in high-security sectors such as banking, financial services, and healthcare. It aims to improve the user experience while enhancing security.
Key Features and Use Cases of CIBA
- Non-User Initiated Requests: CIBA is effective when a user has not actively initiated a login, but an authentication request is necessary. For example, it can be used to verify a user’s identity to approve a financial transaction.
- Limited User Interaction: It is used in scenarios where user interaction for authentication is minimal or non-existent. For example, it may be used in IoT devices or smart home systems requiring authentication.
- Security Requirements: It is used in applications requiring high security. CIBA is based on directly sending authentication requests to the user, who then authenticates using a secure device. This minimizes security vulnerabilities.
How CIBA Works:
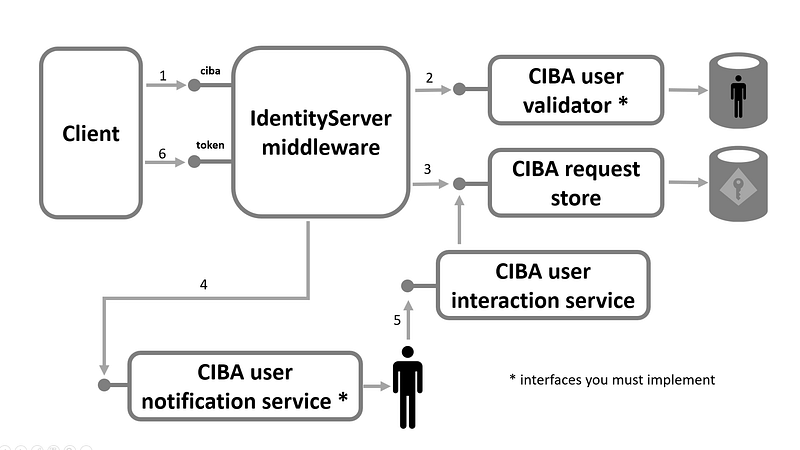
Image from Duende's page.
Step 1.
IdentityServer provides an endpoint for clients to initiate the CIBA workflow through a backchannel authentication request.
Step 2.
After client authentication and basic request parameter validation, the user who the request is for must be identified. This is done using the IBackchannelAuthenticationUserValidator service within Dependency Injection (DI). You need to implement this service and register it with the DI system. The ValidateRequestAsync method validates request parameters and returns a result containing the sub (subject identifier) claim for the user.
Step 3.
Once a user is successfully identified, a record representing the pending login request is created in the Backchannel Authentication Request Store.
Step 4.
Then, the login request should be communicated to the user. This is done using the IBackchannelAuthenticationUserNotificationService service within DI. Implement this service and register it with DI. The SendLoginRequestAsync method should communicate with the user via any suitable mechanism (e.g., email, SMS, push notification, etc.) and possibly provide instructions for the user to initiate the login and consent process (maybe through a link, but other approaches can also be considered). This method is provided with a BackchannelUserLoginRequest containing all contextual information to send to the user for this login request (including the InternalId necessary for completing the request).
Step 5.
The login request information should then be presented to the user (e.g., via a web page on IdentityServer or any other appropriate method). A BackchannelUserLoginRequest can be accessed via InternalId using the IBackchannelAuthenticationInteractionService. After the user consents and allows the login, the result (including which scopes the user agreed to) should be recorded using the CompleteLoginRequestAsync method.
Step 6.
Finally, after polling to receive the result, the client will be issued the requested tokens (or an appropriate error if the user has denied the request or it has timed out).
Now, let’s create a simple CIBA example project.

As shown in the image, we created our .Net 8 project. Let's add the following packages to our project:
<PackageReference Include="Duende.IdentityServer" Version="7.0.6" />
<PackageReference Include="Swashbuckle.AspNetCore.SwaggerGen" Version="6.7.2" />
<PackageReference Include="Microsoft.AspNetCore.OpenApi" Version="8.0.8" />
<PackageReference Include="Swashbuckle.AspNetCore.SwaggerUI" Version="6.7.2" />
Let’s now create an interface named “ICibaRequestStore.cs” and a class named “CibaRequestStore.cs” inheriting from this interface under a folder named “Stores” to complete our pending CIBA requests. (I tried to explain the code lines with comments.)
namespace CibaExample.Api.Stores;

public interface ICibaRequestStore
{
    Task CompleteCibaRequestAsync(string id); // Completes the pending Ciba request
}
We’ll need to dive a bit more into the CibaRequestStore.cs class:
using Duende.IdentityServer.Models;
using Duende.IdentityServer.Services;
using Duende.IdentityServer.Stores;
using Duende.IdentityServer.Stores.Serialization;
using System.Security.Claims;

namespace CibaExample.Api.Stores;

public class CibaRequestStore : DefaultGrantStore<BackChannelAuthenticationRequest>, ICibaRequestStore
{

    private IBackchannelAuthenticationInteractionService _cibaInteractionService;
    public CibaRequestStore(string grantType, IPersistedGrantStore store, IPersistentGrantSerializer serializer, IHandleGenerationService handleGenerationService, ILogger logger, IBackchannelAuthenticationInteractionService cibaInteractionService) : base(grantType, store, serializer, handleGenerationService, logger)
    {
        _cibaInteractionService = cibaInteractionService;
    }

    public async Task CompleteCibaRequestAsync(string id)
    {
       var persisted = await Store.GetAsync(id);
       if (persisted == null)
       {
           throw new NullReferenceException("Grant not found");
       }
       var backChannelAuthenticationRequestData = Serializer.Deserialize<BackChannelAuthenticationRequest>(persisted.Data);
        var completeRequest = new CompleteBackchannelLoginRequest(id)
       {
           InternalId = id,
           Subject = new ClaimsPrincipal(new ClaimsIdentity(new Claim[]
           {
               new Claim("sub", persisted.SubjectId) // The subject identifying the user (e.g., user_id)
           })),
           ScopesValuesConsented = backChannelAuthenticationRequestData.RequestedScopes
        };

       await _cibaInteractionService.CompleteLoginRequestAsync(completeRequest);


    }

}
- Constructor Parameters:
grantType: Specifies the type of grant to be issued.
store (IPersistedGrantStore): The interface used to manage persisted grants used in authentication processes. These persisted grants include long-term permissions, access tokens, refresh tokens, and other grant types used in OAuth 2.0 or OpenID Connect protocols. Main functions include:
- Token Storage
- Token Update
- Token Deletion
- Token Retrieval
serializer: Used for data serialization and deserialization.
handleGenerationService: Service used to create a unique identifier (handle).
logger: Used for logging operations (ILogger interface).
cibaInteractionService (IBackchannelAuthenticationInteractionService): Service used to manage CIBA interactions.
- CompleteCibaRequestAsync Method:
Our custom method written to complete the pending CIBA request.
Now, let’s implement the “BackchannelAuthenticationUserValidator” class implementing the “IBackchannelAuthenticationUserValidator” interface for our user validation processes and a “TestUser” class containing the users we’ll use as examples in these processes.
using Duende.IdentityServer.Test;
using Duende.IdentityServer;
using IdentityModel;
using System.Security.Claims;
using System.Text.Json;

namespace CibaExample.Api;

public static class TestUsers
{
    public static List<TestUser> Users
    {
        get
        {
            var address = new
            {
                street_address = "One Hacker Way",
                locality = "Heidelberg",
                postal_code = "69118",
                country = "Germany"
            };

            return new List<TestUser>
            {
                new TestUser
                {
                    SubjectId = "1",
                    Username = "alice",
                    Password = "alice",
                    Claims =
                    {
                        new Claim(JwtClaimTypes.Name, "Alice Smith"),
                        new Claim(JwtClaimTypes.GivenName, "Alice"),
                        new Claim(JwtClaimTypes.FamilyName, "Smith"),
                        new Claim(JwtClaimTypes.Email, "AliceSmith@email.com"),
                        new Claim(JwtClaimTypes.EmailVerified, "true", ClaimValueTypes.Boolean),
                        new Claim(JwtClaimTypes.WebSite, "http://alice.com"),
                        new Claim(JwtClaimTypes.Address, JsonSerializer.Serialize(address), IdentityServerConstants.ClaimValueTypes.Json)
                    }
                },
                new TestUser
                {
                    SubjectId = "2",
                    Username = "bob",
                    Password = "bob",
                    Claims =
                    {
                        new Claim(JwtClaimTypes.Name, "Bob Smith"),
                        new Claim(JwtClaimTypes.GivenName, "Bob"),
                        new Claim(JwtClaimTypes.FamilyName, "Smith"),
                        new Claim(JwtClaimTypes.Email, "BobSmith@email.com"),
                        new Claim(JwtClaimTypes.EmailVerified, "true", ClaimValueTypes.Boolean),
                        new Claim(JwtClaimTypes.WebSite, "http

://bob.com"),
                        new Claim(JwtClaimTypes.Address, JsonSerializer.Serialize(address), IdentityServerConstants.ClaimValueTypes.Json)
                    }
                }
            };
        }
    }
}
using System.Security.Claims;
using Duende.IdentityServer.Validation;
using IdentityModel;

namespace CibaExample.Api.Validators;

public class
using System.Security.Claims;
using Duende.IdentityServer.Validation;
using IdentityModel;

namespace CibaExample.Api.Validators;

public class BackchannelAuthenticationUserValidator : IBackchannelAuthenticationUserValidator
{

  public Task<BackchannelAuthenticationUserValidationResult> ValidateRequestAsync(BackchannelAuthenticationUserValidatorContext userValidatorContext)
  {

      var user = TestUsers.Users.FirstOrDefault(u => u.Username == userValidatorContext?.LoginHint);

      return Task.FromResult(new BackchannelAuthenticationUserValidationResult
      {
          Subject = new ClaimsPrincipal(new ClaimsIdentity(new List<Claim>
          {
              new Claim("sub", user?.SubjectId),
              new Claim(JwtClaimTypes.AuthenticationTime, DateTime.UtcNow.ToEpochTime().ToString()), // auth_time claim
              new Claim(JwtClaimTypes.IdentityProvider, "local"),
          })),
      });
  }
} : IBackchannelAuthenticationUserValidator
{

  public Task<BackchannelAuthenticationUserValidationResult> ValidateRequestAsync(BackchannelAuthenticationUserValidatorContext userValidatorContext)
  {

      var user = TestUsers.Users.FirstOrDefault(u => u.Username == userValidatorContext?.LoginHint);

      return Task.FromResult(new BackchannelAuthenticationUserValidationResult
      {
          Subject = new ClaimsPrincipal(new ClaimsIdentity(new List<Claim>
          {
              new Claim("sub", user?.SubjectId),
              new Claim(JwtClaimTypes.AuthenticationTime, DateTime.UtcNow.ToEpochTime().ToString()), // auth_time claim
              new Claim(JwtClaimTypes.IdentityProvider, "local"),
          })),
      });
  }
}
Now let’s add the class to send a verification request via PushNotification, SMS, or Email when we create a CIBA request. Here, we’ll print the “ID” value to the console for verification.
using Duende.IdentityServer.Models;
using Duende.IdentityServer.Services;

namespace CibaExample.Api.Services;

public class BackchannelAuthenticationUserNotificationService : IBackchannelAuthenticationUserNotificationService
{
    public Task SendLoginRequestAsync(BackchannelUserLoginRequest request)
    {
        Console.WriteLine($"**Sending login request to user with request ID {request.InternalId}");
        return Task.CompletedTask;
    }
}
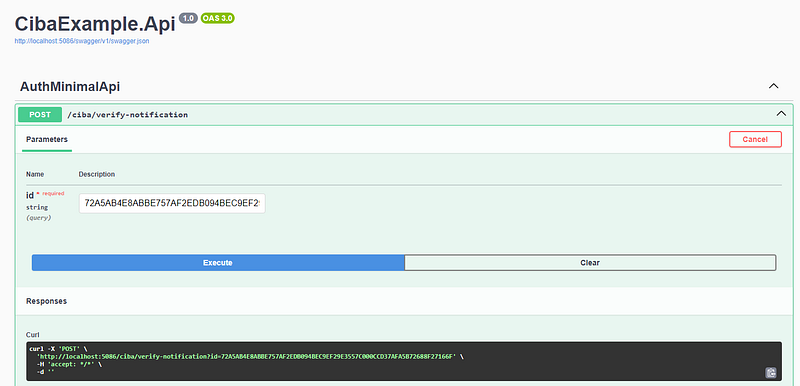
Let’s add the endpoint to verify our pending CIBA request using the “ID” value printed to the console.
using CibaExample.Api.Stores;
using Microsoft.AspNetCore.Mvc;
namespace CibaExample.Api.Apis;

public static class AuthMinimalApi
{

    public static void UseCibaEndPoints(this IEndpointRouteBuilder routes)
    {
        var group = routes.MapGroup("ciba");

        group.MapPost("verify-notification",VerifyAsync).WithName("verify").WithOpenApi();
    }

    private static async Task<IResult> VerifyAsync([FromServices] ICibaRequestStore store,string id)
    {

       await store.CompleteCibaRequestAsync(id);

       return Results.Ok(true);
    }
}
And finally, let’s configure IdentityServer and define our “Ciba Client” in the “Program.cs” class.
using CibaExample.Api;
using CibaExample.Api.Apis;
using CibaExample.Api.Services;
using CibaExample.Api.Stores;
using CibaExample.Api.Validators;
using Duende.IdentityServer.Models;
using Duende.IdentityServer.Services;
using Duende.IdentityServer.Stores;
using Duende.IdentityServer.Stores.Serialization;
using IdentityModel;

var builder = WebApplication.CreateBuilder(args);


builder.Services.AddIdentityServer(opt =>
    {
        opt.Events.RaiseErrorEvents = true;
        opt.Events.RaiseSuccessEvents = true;
        opt.Events.RaiseFailureEvents = true;
        opt.Ciba.DefaultLifetime = 600;
    })
    .AddInMemoryClients(new List<Client>
    {
        new Client
        {
            ClientId = "ciba_client",
            AllowedGrantTypes = { OidcConstants.GrantTypes.Ciba, OidcConstants.GrantTypes.RefreshToken},
            RefreshTokenExpiration = TokenExpiration.Sliding,
            AllowOfflineAccess = true,
            AllowAccessTokensViaBrowser = false,
            CoordinateLifetimeWithUserSession = true,
            UpdateAccessTokenClaimsOnRefresh = true,
            CibaLifetime = 180,
            RefreshTokenUsage = TokenUsage.ReUse,
            Enabled = true,
            ClientSecrets = { new Secret("secret".Sha256()) },
            AllowedScopes = {"openid", "profile", "api" },
            AccessTokenLifetime = 180,
            IdentityTokenLifetime = 180

        }
    })
    .AddInMemoryIdentityResources(new List<IdentityResource>
    {
        new IdentityResources.OpenId(),
        new IdentityResources.Profile()
    })
    .AddInMemoryApiScopes(new List<ApiScope>
    {
        new ApiScope("api", "Ciba Api")
    }).AddTestUsers(TestUsers.Users)
    .AddBackchannelAuthenticationUserValidator<BackchannelAuthenticationUserValidator>()
    .AddBackchannelAuthenticationUserNotificationService<BackchannelAuthenticationUserNotificationService>()
    .AddDeveloperSigningCredential();

builder.Services.AddEndpointsApiExplorer();
builder.Services.AddSwaggerGen();
builder.Services.AddTransient<ICibaRequestStore, CibaRequestStore>(serviceProvider =>
{
    var store = serviceProvider.GetRequiredService<IPersistedGrantStore>();
    var serializer = serviceProvider.GetRequiredService<IPersistentGrantSerializer>();
    var handleGenerationService = serviceProvider.GetRequiredService<IHandleGenerationService>();
    var logger = serviceProvider.GetRequiredService<ILogger<CibaRequestStore>>();
    var cibaInteractionService = serviceProvider.GetRequiredService<IBackchannelAuthenticationInteractionService>();

    return new CibaRequestStore(OidcConstants.GrantTypes.Ciba, store, serializer, handleGenerationService, logger, cibaInteractionService);
});

var app = builder.Build();

// Configure the HTTP request pipeline.

app.UseSwagger();
app.UseSwaggerUI();
app.UseIdentityServer();
app.UseCibaEndPoints();
app.Run();
To explain these configurations:
builder.Services.AddIdentityServer(opt =>
{
    opt.Events.RaiseErrorEvents = true;
    opt.Events.RaiseSuccessEvents = true;
    opt.Events.RaiseFailureEvents = true;
    opt.Ciba.DefaultLifetime = 600;
})
We added IdentityServer to the application and defined the settings allowing us to track error, warning, and success events with “opt.Events.Raise*”. With “opt.Ciba.DefaultLifetime”, we defined the lifespan of our CIBA processes (in seconds).
 .AddInMemoryClients(new List<Client>
 {
     new Client
     {
         ClientId = "ciba_client",//The unique identifier of the client.
         AllowedGrantTypes = { OidcConstants.GrantTypes.Ciba, OidcConstants.GrantTypes.RefreshToken},//The types of grants the client can use (CIBA and Refresh Token).
         RefreshTokenExpiration = TokenExpiration.Sliding,//Refresh token duration is continuously renewed.
         AllowOfflineAccess = true,//The client can receive a refresh token for offline access.
         AllowAccessTokensViaBrowser = false,//Access tokens cannot be obtained through the browser.
         CoordinateLifetimeWithUserSession = true,//Token lifespan is coordinated with the user session.
         UpdateAccessTokenClaimsOnRefresh = true, //An access token is requested when the refresh token is used.
         CibaLifetime = 180,//CIBA token duration
         RefreshTokenUsage = TokenUsage.ReUse,//Refresh token usage is reusable.
         Enabled = true,//Is the client active?
         ClientSecrets = { new Secret("secret".Sha256()) },//The shared secret for the client.
         AllowedScopes = {"openid", "profile", "api" },//The scopes the client can access.
         AccessTokenLifetime = 180,//Access token duration
         IdentityTokenLifetime = 180//Identity token duration

     }
 })
Above, we defined our “Client” configurations.
 .AddInMemoryIdentityResources(new List<IdentityResource>
  {
      new IdentityResources.OpenId(), //openid scope
      new IdentityResources.Profile() //profile scope
  })
  .AddInMemoryApiScopes(new List<ApiScope>
  {
      new ApiScope("api", "Ciba Api") //Api scope
  }).AddTestUsers(TestUsers.Users)
  .AddBackchannelAuthenticationUserValidator<BackchannelAuthenticationUserValidator>() //Adds the BackchannelAuthenticationUserValidator class.
  .AddBackchannelAuthenticationUserNotificationService<BackchannelAuthenticationUserNotificationService>() //Adds the BackchannelAuthenticationUserNotificationService class.
  .AddDeveloperSigningCredential(); //Generates a signing key for the developer.
Now, let’s test our application via “Post
man” and “Console.” After the application is up and running, we should see the following configuration information at:

Uncompressed version:
{
  "issuer": "http://localhost:5086",
  "jwks_uri": "http://localhost:5086/.well-known/openid-configuration/jwks",
  "authorization_endpoint": "http://localhost:5086/connect/authorize",
  "token_endpoint": "http://localhost:5086/connect/token",
  "userinfo_endpoint": "http://localhost:5086/connect/userinfo",
  "end_session_endpoint": "http://localhost:5086/connect/endsession",
  "check_session_iframe": "http://localhost:5086/connect/checksession",
  "revocation_endpoint": "http://localhost:5086/connect/revocation",
  "introspection_endpoint": "http://localhost:5086/connect/introspect",
  "device_authorization_endpoint": "http://localhost:5086/connect/deviceauthorization",
  "backchannel_authentication_endpoint": "http://localhost:5086/connect/ciba",
  "pushed_authorization_request_endpoint": "http://localhost:5086/connect/par",
  "require_pushed_authorization_requests": false,
  "frontchannel_logout_supported": true,
  "frontchannel_logout_session_supported": true,
  "backchannel_logout_supported": true,
  "backchannel_logout_session_supported": true,
  "scopes_supported": [
    "openid",
    "profile",
    "api",
    "offline_access"
  ],
  "claims_supported": [
    "sub",
    "name",
    "family_name",
    "given_name",
    "middle_name",
    "nickname",
    "preferred_username",
    "profile",
    "picture",
    "website",
    "gender",
    "birthdate",
    "zoneinfo",
    "locale",
    "updated_at"
  ],
  "grant_types_supported": [
    "authorization_code",
    "client_credentials",
    "refresh_token",
    "implicit",
    "password",
    "urn:ietf:params:oauth:grant-type:device_code",
    "urn:openid:params:grant-type:ciba"
  ],
  "response_types_supported": [
    "code",
    "token",
    "id_token",
    "id_token token",
    "code id_token",
    "code token",
    "code id_token token"
  ],
  "response_modes_supported": [
    "form_post",
    "query",
    "fragment"
  ],
  "token_endpoint_auth_methods_supported": [
    "client_secret_basic",
    "client_secret_post"
  ],
  "id_token_signing_alg_values_supported": [
    "RS256"
  ],
  "subject_types_supported": [
    "public"
  ],
  "code_challenge_methods_supported": [
    "plain",
    "S256"
  ],
  "request_parameter_supported": true,
  "request_object_signing_alg_values_supported": [
    "RS256",
    "RS384",
    "RS512",
    "PS256",
    "PS384",
    "PS512",
    "ES256",
    "ES384",
    "ES512",
    "HS256",
    "HS384",
    "HS512"
  ],
  "prompt_values_supported": [
    "none",
    "login",
    "consent",
    "select_account"
  ],
  "authorization_response_iss_parameter_supported": true,
  "backchannel_token_delivery_modes_supported": [
    "poll"
  ],
  "backchannel_user_code_parameter_supported": true,
  "dpop_signing_alg_values_supported": [
    "RS256",
    "RS384",
    "RS512",
    "PS256",
    "PS384",
    "PS512",
    "ES256",
    "ES384",
    "ES512"
  ]
}
Now let’s initiate our CIBA request with Postman.

We made a request to this address with the “client_id,” “client_secret,” “grant_type,” “login_hint” (we used the username), and scope information. We configured all these definitions in the Program.cs class.
IdentityServer handled many things for us, but for the parts we customized, let’s look at the process steps:
- We validated the user “alice” with the
BackchannelAuthenticationUserValidatorclass. - We printed the “InternalId” value to the console for verification with the
BackchannelAuthenticationUserNotificationServiceclass.
At this point, you can imagine that we are sending a verification to the user via SMS, PushNotification, or Email.
Response value:
{
    "auth_req_id": "3653C1E38A355A8978FCFEA87C48450AEA93A1A9044B20A1FEB37965DB5799AA-1",
    "expires_in": 180,
    "interval": 5
}
Value printed to the console:
**Sending login request to user with request ID 72A5AB4E8ABBE757AF2EDB094BEC9EF29E3557C000CCD37AFA5B72688F27166F
Now, let’s verify this “request ID” value (which is actually the Id of the CIBA request stored in the PersistedStore) using the “ciba/verify-notification” endpoint.
Once the verification request is complete, we can now retrieve our “id_token,” “access_token,” and “refresh_token” parameters using the “auth_req_id” value returned from our initial CIBA request.
Let’s make our request through Postman as follows.

And we successfully received our tokens:
{
    "id_token": "eyJhbGciOiJSUzI1NiIsImtpZCI6IjE1NjFDMEMxQUMzRTYzRjc1NUJGMDA0NTE5Rjg2NTBBIiwidHlwIjoiSldUIn0.eyJpc3MiOiJodHRwOi8vbG9jYWxob3N0OjUwODYiLCJuYmYiOjE3MjU3OTA5NzgsImlhdCI6MTcyNTc5MDk3OCwiZXhwIjoxNzI1NzkxMTU4LCJhdWQiOiJjaWJhX2NsaWVudCIsImF0X2hhc2giOiI3LU9LT25BRkQyX2NISzRzbFlLRFN3Iiwic3ViIjoiMSIsImF1dGhfdGltZSI6MTcyNTc5MDk2NiwiaWRwIjoibG9jYWwifQ.CzOzPbEqa8jN84tL13VH396Qt3IxDOUmPDtbldEC72n_cv_BuqFs1l6S_AGc3FGWA_eW5_lNPEAn-MOT83d0T1WH2CcrmyOICAkEechypZEJIfSPsSpZga911tcz5CRc7sQjEMdCiX7_1byl2ubpXS87HZt8mZkhRfUk0f2e2MfvX_aurBQtWNhXhBuL4VLTocAbPvRr09bDCEbuHuvy39jPcn36r86OjLrnVelATkjswjFnGVaDZkmsPNciDgo-Ivqst0RpvoTZvgwoDiKSQp9vVJ3qWxKfH4AJhLc9Ds8SYX9Rv66raFTosyvKodde8ZWh9DndE-oaigO-cqvmzQ",
    "access_token": "eyJhbGciOiJSUzI1NiIsImtpZCI6IjE1NjFDMEMxQUMzRTYzRjc1NUJGMDA0NTE5Rjg2NTBBIiwidHlwIjoiYXQrand0In0.eyJpc3MiOiJodHR

wOi8vbG9jYWxob3N0OjUwODYiLCJuYmYiOjE3MjU3OTA5NzgsImlhdCI6MTcyNTc5MDk3OCwiZXhwIjoxNzI1NzkxMTU4LCJzY29wZSI6WyJvcGVuaWQiLCJwcm9maWxlIiwiYXBpIiwib2ZmbGluZV9hY2Nlc3MiXSwiY2xpZW50X2lkIjoiY2liYV9jbGllbnQiLCJzdWIiOiIxIiwiYXV0aF90aW1lIjoxNzI1NzkwOTY2LCJpZHAiOiJsb2NhbCIsImp0aSI6IkMwRkIzOTlCRTc3NTEwNjBDOUIxQUJBNTU3MzFCMTI5In0.LLHS72AWpI5L4943dLD9UdYs4f08BM9TgWA_5LGIAOvloenER83U2ENmG_BHxFeU3mZOZPugvtfzyEQ8iruOMN80bwOZL7wb_bSE1FoBMepAvaHxc8BWNk_O6GBSJyO-0GPjkmFGu-mCENBmRGvwPVI2ydzubQnGrvXxHQs9OWfM9OOVeM44aRpVlcFX86ZDYCjd9uhtzMkNTJ4gMPRVDAPMOqqePPFbV8ON9RdleivjQmmrFJUrDfTOdSXjQW64VOEicJwZgg0Doi-XGtjmHDVD_Cfi-8zEeH2tNqIVuTpD9EszcnPGMWo5cJT3_fQ-EoQXwRAGNa_IC2Y6Y0y-hw",
    "expires_in": 180,
    "token_type": "Bearer",
    "refresh_token": "0CA49D2668E29984C4622D1F12786D55E657793F1FF255876EAB6005B2BFE712-1",
    "scope": "openid profile api offline_access"
}
This brings us to the end of our article. In my next article, I will attempt to cover “Kafka Integration with .Net 8”.
0 Yorum